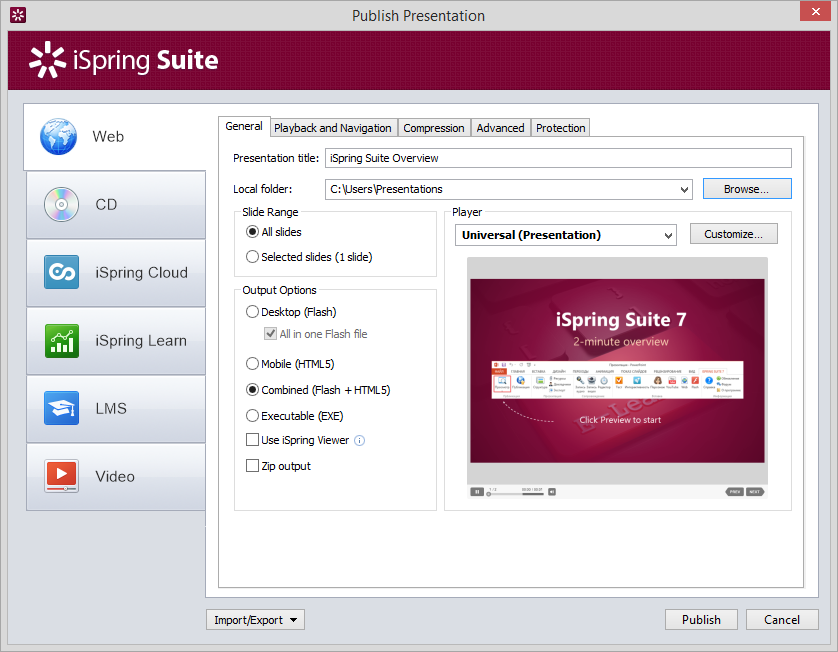
General Options
The General tab allows you to specify the output of your PowerPoint presentation: title, destination and format.

Table 1. Destination Options
| Option | Description |
|---|---|
| Presentation title | A title of your presentation. |
| Local folder | A local folder where you want to publish your presentation to. |
Table 2. Slide Range Options
| Option | Description |
|---|---|
| All slides | Select this option if you want to convert the entire presentation into Flash and HTML5 format. |
| Selected slides | This option will allow you to publish only selected slides from your presentation.
|
Table 3. Output Options
| Option | Description |
|---|---|
| Desktop (Flash) | Presentation will be converted into a Flash movie. You can view it in any browser with Flash plugin on any desktop operating system. |
| All in one Flash file | All slides of a presentation will be converted into a solid Flash movie with all external resources embedded in one .swf file. To view the presentation, run the .swf file in the output folder with the name that you specified while publishing. |
| Mobile (HTML5) | Presentation will be converted into the HTML5 format. A great advantage of HTML5 presentations is that they can be viewed on any mobile device, including iPads. |
| Combined (Flash + HTML5) | Presentation will be published as a "smart" package which can be successfully launched on both desktop and mobile devices. |
| Executable (EXE) | If selected, iSpring Suite generates an executable (.exe) file with the Flash output. It can be displayed everywhere, even if you don't have the Flash Player installed. To view the presentation, run the .exe file in the output folder with the name that you specified while publishing. |
| Use iSpring Viewer | Select this checkbox to view a presentation on an iPad and allow users to store presentations locally for offline viewing. |
| Zip output | Select this checkbox if you want to publish your presentation as a ZIP archive. |
Table 4. Player Template Options
| Option | Description |
|---|---|
| Player | Select a player from the drop-down menu. You can select one of the available players (Universal or None) or add a custom player by installing it from a special package. |
| Customize | This button gets enabled if the selected player can be customized. Click this button to open the customization window of the selected player. The Live Preview feature shows how your presentation will look after conversion. |
Table 5. iSpring Learn Options
| Option | Description |
|---|---|
| Upload source files | Check this box to allow uploading the project source files to iSpring Learn. Tip: You can use this option both for team-work on the project and for creating backups of source files. |
Table 6. Video Presentation Options
| Option | Description |
|---|---|
| Destination | Choose the place where you want to save your video presentation: My Computer or YouTube.
|
| Video profile | Select a video profile to choose the most suitable resolution depending on the device. You have the following preset options:
|
| Playback Options | Specify the time to spend on a slide in the resulting video. You can set timings in seconds or sub-seconds. If you selected individual slide timings and set the automatic playback of the animation effects for your PowerPoint presentation, these settings will be preserved in the resulting video file. |