Presenters
The Presenters manager tool allows you to add, edit and delete presenters in your course. The information about presenters can be displayed as a block over the outline:

Or, in the top bar as a drop-down menu:

All information about presenters is stored in your presentation. It's available even when you edit your PowerPoint presentation on another computer or send it via email. Presenter info is also stored on your local computer, so when you open a presentation, you can always update presenter's info.
Since it is stored in your computer, presenter info can be updated and added to any presentation.
All presenters you add can be managed in the Presentation Resources window. To delete a presenter, select a presenter and click the Delete button.
Adding/Editing Presenters
To add or edit a presenter's details:
- Click the Presentation Resources icon on the iSpring toolbar.

- Switch to the Presenters tab.

Next, click the Add button at the bottom of the window.
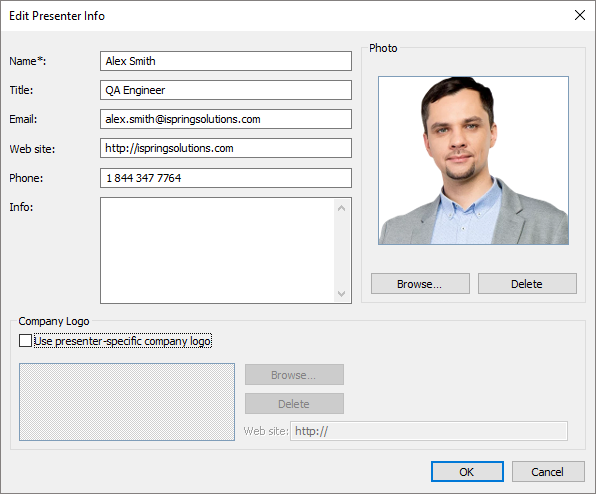
In the Edit Presenter Info window, enter the details into the corresponding fields and click OK to save the changes.
The Name field is required, other fields are optional. If you leave the optional fields blank, they won't appear in the Presenter info area in the course.

You can enter the following info about a presenter:
| Presenter Info | |
|---|---|
| Name | The first and the last name of the presenter. |
| Title | The title describes the position held by the presenter (e.g. Project Manager). |
| The email address of the presenter. | |
| Web site | Presenter's web site address |
| Phone | Presenter's phone number |
| Info | Brief info about the presenter, work experience, a success story or any information you consider valuable to viewers. |
| Photo | Click the Browse button to add or change a presenter's photo. iSpring supports all most popular image file formats: JPG, PNG, GIF, BMP, WFM, EMF. If a photo does not fit, iSpring automatically resizes it to fit the width/height of the photo area in a player |
| Company Logo | Select the Use presenter-specific company logo checkbox to set a custom company logo for a specific presenter. Click Browse and select an image file in JPG, PNG, GIF, BMP, WMF or EMF format. You can also specify a link to a website to open when the company logo is clicked. A company logo and website that would apply to all presenters without a specific logo can be set using the Default Company tab of the Presenters window. |
To update info on an existing presenter, select a presenter and click the Edit button at the bottom of the window.
Exporting and Importing Presenters
You can export information about presenters into a file to transfer it to another computer or to create a backup.

To export the information about presenters:
- Select presenters from the list you want to export. If you want to export several presenters, select them while holding down the Shift or Ctrl keys.
- Click Export button in the bottom-right corner of the window.
- In the Save As dialog box, type a name for your presenters' file.
- Click Save. The information about presenters will be saved into a file (.ispres format).
To import the information about presenters:
- Click Import button in the bottom-right corner of the window.
- In the Open dialog box, select your file (.ispres format).
- Click Open button. Information about presenters will be imported from your file.